Table of Contents
Batch Shader Swapper
This tool can help you convert existing scenes or even your entire project to use Weatherade shaders.
Conversion Mode
First of all you should decide what exactly you want to convert.
You can choose one of three options:
- ⠀Selected⠀ - only the materials selected in the folders will be added to the conversion list.
- ⠀Scene⠀ - find materials that exist only in the currently open scene.
- ⠀Project⠀ - find all materials in the entire project.
Shader Pairs
Once you selected a mode, you will be able to fill the shader pairs list.
If you use Selected, you will be prompted to select some materials from the Project window.
If you use Scene or Project, the ⠀Find Shaders⠀ button will be displayed below. Click it, and the list of shader pairs will be filled automatically.
Now you can modify the list by deleting, adding or editing its elements.
To delete any element from the list, just click this little ⠀-⠀ button to the right of it. This may be needed if the tool added a shader, that don't need to be converted, for example a particle effect shader.
To add an element, click the ⠀+⠀ button under the last element.
You can change both Source Shaders and Target Shaders for every element.
Replace Shaders
For example, if you are about to replace Standard shader to Weatherade Snow Coverage shader for the whole project, the tool window will look like that:
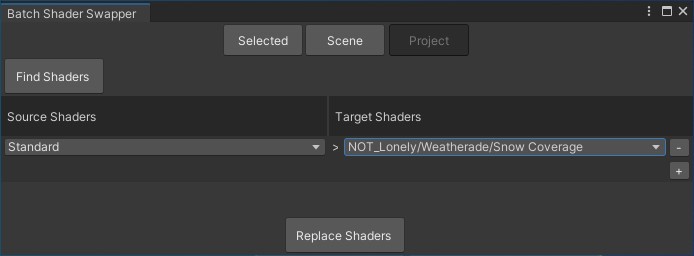
After clicking the ⠀Replace Shaders⠀ button the following will happen:
- All materials in the entire project, that use the Standard shader, will be collected
- These materials shader will be changed to NOT_Lonely/Weatherade/Snow Coverage.
To get everything back, you will need to swap the shaders for the Source and Taget shaders and click ⠀Replace Shaders⠀ again.