Table of Contents
GPU Particle System
Weatherade has its own GPU-based particle system that is finely tuned to create snowfall or rain effects with excellent performance.
Internally it generates a particles mesh as a grid of separated quads and then simulate their movement using the power of shaders.
Create
To create an emmiter, use the object creation menu: GameObject ⇒ NOT_Lonely ⇒ Weatherade ⇒ GPU Particles Emitter
A new emitter will appear in the scene directly above the scene view camera.

Main Settings
Generate Mesh at Runtime
Determines whether the particle mesh will be generated in the editor or in Start function at runtime.
Emitter Size
Size of the particle emitter square in its local space.
Particles Count
How many particles will be generated in the particle mesh by X and Z axis.
Follow Target
Forces the emitter transform to follow an object in the scene. The checkbox enables the use of the “Follow Target” function. The Transform field on the right allows you to explicitly specify the object to follow.
If this option is enabled, the Offset property will also appear. This is the position offset relative to the Follow Target object.
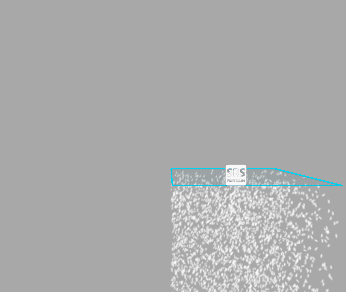
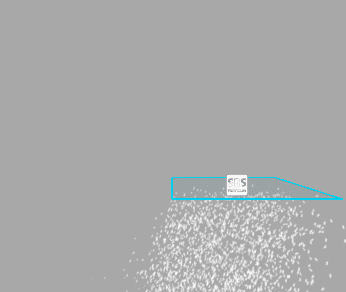
Warp Positions
When move the emitter, particles will be teleported to the opposite side of the emitter once they reached the border of the emitter bounds. Treat it as if you were looking at an infinite volume of particles through a window frame.
Below you can see how it works (left - Warp Positions enabled, right - disabled):
Height Modifier
If the Warp Positions option is enabled, you can adjust the emitter depth using this property so that the particles will teleport to their original position before their life cycle ends.
Forced Teleport Threshold
If this emitter changes its position too much between frames (teleporting in VR or similar cases), instantly teleport the particles to the new emitter position using this threshold value as a trigger.
Emission
Play On Awake
Determines whether the system will start playing automatically when the game starts.
Prewarm
When playing, the pre-warmed system will be in a state as if it had been playing for some time.
Steps
How many simulation steps are used to prewarm the system.
Emission Rate
A percentge of visible particles between 0 and total particles count
Paticle Size
You can choose how the particles size will be calculated, pressing this little ▼ button to the right of the input field.
There are two available options:
- Constant
- Random
Constant
All particles will be the same size.
Random
The size of each particle will be calculated randomly within the minimum/maximum range.
Lifetime
You can choose how the particles life time will be calculated, pressing this little ▼ button to the right of the input field.
There are two available options:
- Constant
- Random
Constant
All particles will have the same lifetime.
Random
The lifetime of each particle will be calculated randomly within the minimum/maximum range.
Color
You can choose how the particles color will be calculated, pressing this little ▼ button to the right of the color field.
There are four available options:
- Constant
- Random Over Lifetime
- Random Between Two Gradients
- Random Between Two Gradients Over Lifetime
Constant
A simple color field is used. All particles will have the same color.
Random Over Lifetime
A gradient color field is used. Every particle will change its color during its lifetime cycle usgin this gradient.
Random Between Two Gradients
The color will be selected randomly from these two gradients. The floating point input field between the gradients represents the ratio between them.
Random Between Two Gradients Over Lifetime
The color will be selected randomly from these two gradients over life time. The floating point input field between the gradients represents the ratio between them.
Sparkle
The particles will react to the scene light by flickering.
Frequency
Determines how often the particles will flicker during their life cycle.
Sun Tag
The object with this tag will be considered as a sun. The direction of its transform will be used to calculate the sparkling area.
If an object with this tag is found in the scene, several more properties will be displayed below.
Found sun
Not editable field, just for debug purposes.
Color
An HDR color for the sparkle effect.
Spread
Defines, how far around the “Sun” will the sparkle effect mask spread.
Sharpness
Sharpness of the sparkle effect mask.
Distance
Distance from the camera where the effect becomes visible.
Secondary Lights
Use point and spot lights in the sparkle effect.
Max Lights
Maximum lights count used in the sparkle effect calculations. The lights are sorted by the distance between them and this particle emitter.
Points Multiplier
Multiplies the intensity values of point lights used to calculate the sparkle effect.
Spots Multiplier
Multiplies the intensity values of spot lights used to calculate the sparkle effect.
Velocity
You can choose how the particles velocity will be calculated, pressing this little ▼ button to the right of the input field.
There are four available options:
- Constant
- Curve
- Random Constants Over Lifetime
- Random Curves Over Lifetime
Constant
All particles will use the same constant velocity.
Curve
Velocity will be calculated using the curve over the lifetime of the particle.
Multiplier
A multiplier vector that is used to scale the original velocity vector defined by the curve. This vector is applied in world space.
Random Constants Over Lifetime
Velocity will be calculated using two curves over the lifetime of the particle. Random values will be selected from the range between curves A and B.
Multiplier
A multiplier vector that is used to scale the original velocity vector defined by the curve. This vector is applied in world space.
Sine Amplitude
The amplitude of the additional sinusoidal wobble applied to the velocity of particles in world space.
Frequency
Sinusoidal wobble frequency.
Rotation
You can choose how the particles rotation will be calculated, pressing this little ▼ button to the right of the input field.
There are two available options for both propeties:
- Constant
- Random
Start Rotation
Constant initial rotation for each particle.
Start Rotation Random
Random range of initial particle rotations.
Speed
Constant particle rotation speed.
Speed Random
Random range of particle rotation speed.
Collision
The Weatherade GPU particle system implements ultra-fast depth-based collisions, allowing particles to be killed when they collide with any object in the scene. This is much faster than particle collision in Unity's particle system since it is calculated entirely on the GPU.
Its performance does not depend on the number of particles.
Enable Particles Collision
Enables collision to prevent particles from passing through world surfaces.
Depth Source
Scene depth texture source. Used to calculate particles collision.
- Global
- This Emitter
If you have a coverage instance in the scene, you can reuse its depth texture by setting this parameter to “Global” and the Сoverage Instance's Depth Texture Format to ARGB Half or ARGB Float, since these two formats contain an additional channel with the unmodified depth texture.
If the Depth Texture Source option is set to This Emitter, several more options will appear below.
Depth Texture Resolution
Resolution of the depth texture used for collision calculations. Use the smallest value possible and only increase it if particles start to pass through objects in the scene.
Mask
Object layers that will be included in the collision depth texture. Think of these as objects that particles will collide with.
Realtime Update
Defines whether the depth texture should be updated in realtime with the set Interval.
Interval
The interval in seconds for the depth texture update. If set to 0, the emitter will perform depth updates every frame. Use values greater than 0 to improve performance.
Renderer
Texture
The particle mask texture. It uses the following channels:
- ⠀R⠀ - far mask
- ⠀G⠀ - near mask
Refraction
Enables refraction for the particles.
If this option is enabled, an additional texture field will appear.
Normal
A normal map texture that is used for the Refraction effect.
Stretch
Stretch factor for particles. Values greater than 0 will stretch the particles in the direction they move.
Blur Distance
The distance where the ⠀R⠀ and ⠀G⠀ channels of the Texture blend ends.
Falloff
The size of the transition between the unblured and blured particle.
Opacity Fade Start
The distance from the camera at which the particles will begin to lose their opacity.
Falloff
The size of the transition between the original opacity and fully transparent particle.